Sunday, August 23, 2009

Thank You Notes for Each Guest


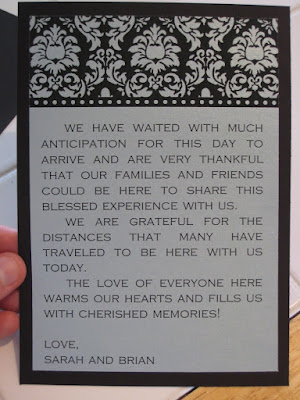
So many people have helped, offered to help, and provided such support to Future Hubby and I during all this planning, that we wanted to let each wedding guest know how much we appreciate them and their presence at our wedding.

The easiest way we could think we doing this, in addition to going from table to table and greeting our guests, was to tuck a thank you note into the napkin at each place setting. The message also thanks those who traveled to join us, including both sets of my parents and the groom's grandpa.


To see how to assemble these notes, click here. And since we already a ton of paper left over from making the invitations and inserts, this project only cost us the price of three roller adhesives: $6.00!

What other methods of "thank you" have you seen at weddings (or that you used at your wedding)?

Fabulous, D.I.Y. Cupcake Stands!


Good riddance to a traditional cake - let them eat cupcakes! That's right, our guests will be able to choose from three delicious cupcake flavors: chocolate raspberry, chocolate abuelita (like a cinnamon chocolate), and lemon raspberry.

We are expecting approximately 160 guests. Well, if you have researched cupcake stands, then you know most stands don't hold that many. The reception venue usually puts some of the cupcakes out at the beginning of the reception and continues to fill the stand as guests help themselves. Furthermore, to rent a stand can be expensive ($80-$150 per stand). So, we asked ourselves, why not make cupcake stands able to hold ALL of the cupcakes and then sell them after the wedding?

Future Hubby has a friend who owns his own woodworking studio, and the two of them cut long planks of paint-grade plywood (purchased from Lowe's) into smaller squares. They then used a special woodworking tool (that's the technical term - ha ha ha!) to add a decorative edge that resembles crown moulding. After getting the measurements of one cupcake from our cupcake vendor (Betty's Sweet Dreams), we determined how many cupcakes would be able to fit on each layer. Here is the schematic we designed:

Each stand can hold seventy-six cupcakes, times two stands, that's 152 cupcakes. That leaves eight cupcakes leftover, plus the six-inch cake we ordered to have something to cut during the reception. Solution: a two-tiered stand for the cake and remaining cupcakes!


A trip to Home Depot resulted in three lengths of wood dowel used to hang clothing in a closet. These poles would serve as the center posts in the middle of each stand. But how to attach each layer of the stand to the pole? Just use the brass caps that normally attach to the closet wall and hold the pole in place! After many frustrating attempts to keep each layer level (seriously, this was not as easy as you might think!), Future Hubby was able to attach a brass cap under each layer and screw them into the center pole for support. (He discovered that assembling them upside down was easier.)


And here are all three stands ready to paint!


But wait! What are those cute little feet holding the stands off the floor? Michael's has an entire row of unfinished wood products, including little hexagonal boxes. After digging through all miniature boxes (the Michael's staff must think I'm a pain in the butt!), I purchased twelve boxes, ditched their lids, and Future Hubby attached them to the bottom of the stands using short screws.
We used semi-gloss white paint (there is a new line that is a combination of primer and paint) purchased from the Home Depot to paint the stands. Since these would sit on a table at the reception, we also painted the undersides for when short people (like me!) came forward for a cupcake.


If you are interested in purchasing these after mid-October (and live in the Los Angeles area), leave a comment on this posting and let me know!

TOTAL COST FOR ALL THREE STANDS:
Paint-grade plywood (2 pieces of 16"x72"x21/32"): $28.48
Paint-grade plywood (1 piece of 16"x36"x21/32"): $7.23
8' of closet dowel/pole: $10.80
14 brass closet pole holders: $23.66
12 mini boxes made into feet: $12.00
1 quart of white paint: $14.98
TOTAL COST: $96.15

Wedding Favors: Mint Tins


Wedding favors come in all shapes and sizes, but they all have one purpose: to give your guests a small, personalized token of appreciation that they can take away from the wedding. Future Hubby wanted to give jordan almonds, I wanted mini breath mints, and we both liked M&Ms. In the end, mini mints won out!


Here's how to make these favors in a cost-conscious way. We purchased the white, 1.75"x1.25" hinged tins online from Clay Alley. Most online candy stores sell various mints by the 5-pound bag. We purchased one bag of Mighty Mini Mints (I didn't make up that name) from A Candy Store. Turns out, the mints are smaller than I expected, so we ended by purchasing a second bag. The stickers were designed using Avery I.D. permanent labels model 6570 from Buy.com (I used the rest of the labels - 480 come in one pack - for the stickers on the back of the invitation envelopes). I cut and pasted part of our dandy damask design onto each square on the Word template (all Avery product template can be downloaded here.) It took me an evening to stick on all those stickers, but with the TV on in the background, the time flew!

After the wedding, guests can reuse the mini tins for things like carrying vitamins or other pills, or storing little desktop items like pins or paperclips.

COST FOR THIS PROJECT:
175 white, hinged tins: $182.00
mighty mini mints (two 5-pound bags): $53.88
Avery labels: $15.44
TOTAL COST: $251.32

Friday, August 14, 2009

eBay (A.K.A. One Woman's Trash is Another Woman's Treasure)


Let me just tell you how much I love eBay. Seriously. And let me tell you how much I love eBay now that I am planning for a wedding on a budget!

Early summer is a peak time for weddings, which means late summer/early autumn is a peak time for eBay deals on previously-owned wedding stuff. Now is the time to find great deals on all those items that only get used for a little bit, never to be seen again. Here are some items I highly recommend you buy on eBay, rather than buying new:

Card box
Cake knife set
Ring bearer pillow
Flower girl baskets
Archway/arbor (or rent one)
Table linens (custom-made overlays that the venue doesn't provide)
Unity candle holders
Cake/cupcake stands (mine will be on sale on eBay following our wedding)
Bubbles
Ribbon, tulle, and all that swag
Favors boxes
Artificial flowers
Easels (for displaying photos and seating charts)
Unused guest book
Guest book pen sets
Paper lanterns
Cake toppers
Shoes (I always buy my Steve Maddens off eBay)

Think of all the savings! For those of you who are extremely practical, you can buy wedding dresses and bridesmaid dresses on eBay or other online stores, too. Part of me wants to sell my wedding dress on eBay after the wedding - that's the part of me that resembles Steve Martin's character in Father of the Bride (recall the hotdog/hotdog bun scene). I most likely won't, but it's tempting, especially when one considers the cost to have the thing cleaned and stored after the wedding.

Happy bargain shopping!

Sunday, August 9, 2009

Do-It-Yourself Invitations - Final Product (Some Assembly Required)


Here they are! Our wedding invitations. I just LOVE saying that! (Fun fact: If you send an invite to the White House, you will receive a congratulations from the President! For a list of VIPs to invite, click here.)

After much research and falling in love with so many different invitation designs, weeks of designing on our own, and finding paper at a bargain, we were ready to print and assemble. Our goal in making our own invitations was two-fold: save money and use as little paper as possible. As a means of saving money, we designed all the printing to be in black ink, and used our own printer on high quality. It actually ended up using less ink than I had originally expected. In order to save paper, we ditched the traditional inner envelope and number of inserts used. Rather than have our guests mail an RSVP card back to us (which uses more paper and costs more in postage), we included a small insert that read,

"The favor of your response is requested by [date]. In order to RSVP and
read more about the details of the wedding and reception, please visit our
website: [URL address]."

Because the wedding venue is a down a country road, we included an insert that had a map on one side and the venue's address with driving directions on the other. I was able to print two invitations on one 8.5"x11" piece of paper, eight RSVP inserts on one piece, and four maps on one piece of paper. That meant just under 100 sheets of blue paper for all invitations and inserts. Using my nifty Martha Stewart paper trimmer ($24.99 at Michaels), I sliced all the pieces apart in one evening.

I used permanent adhesive tape designed for scrap booking to attach the blue paper to the black. eBay comes in handy for buying this adhesive tape in bulk. I bought six Darice Permanent Adhesive Rollers from eBay store Wholesale Craft Outlet for $11.98 plus $4.92 in shipping. These rollers are like those correction tape rollers, only larger. They take some practice getting used to, though.

I was stumped, though, when it came to putting all three pieces in the envelope. Do I just toss them in the envelope in descending size order? That seems a little too unceremonious. Do I tie a ribbon around all three? Eh. That's when Future Hubby came up with a brilliant idea: cut two slits in the back of the invitation's black backing and tuck the inserts into the slits!

What a neat little package! I purchased Avery labels (model #6570) from eBay store Buy for $9.14 plus $6.30 shipping and used our damask design to create fancy stickers to seal the envelopes.

Now all I have to do is monitor our website for RSVPs! (Fun fact: Some of our friends RSVPed online weeks before the invites were sent out. Yep, those are my peeps!)

COST FOR D.I.Y. INVITATIONS:
Aspire Petallic Juniper Berry paper (350 sheets): $37.97
Aspire Petallic Juniper Berry envelopes (250): $45.97
Shipping for Petallic paper: $12.73
Wausau Astrobright Eclipse paper (250 sheets): $24.57
Martha Stewart paper trimmer: $24.99
Darice Permanent Adhesive Rollers (6): $16.90
Avery I.D. Labels (#6570): $15.44
Printing (used own printer and black cartridge): free
Calligraphy on envelopes: $14
Postage for 100 envelopes: $44.00
TOTAL COST: $236.57

When you consider that it would have cost at least $600 for 105 invitations (without postage), that's a great savings!

Do-It-Yourself Invitations - Paper

Looking to save money on your invitations? Make them yourself! But beware: paper can cost a pretty penny and before you know it, you have spent almost as much as if you had purchased invitations from a vendor.

In my quest to stay within our wedding budget, I did what any good sleuth would: I perused the aisles of a local fine paper store, wrote down the names of papers I liked, and then went online to find them for a cheaper price! (What did we do before the Internet???)

Future Hubby and I decided that the invitations should be light blue and black to match the wedding colors. I also had a few other criteria when picking out paper:
1) affordable
2) made from 30% recycled material
3) recyclable
4) awesome looking

During my hunt in the local paper warehouse, I found the following potential papers:


Classic Crest, 80 lb. cover, 8.5"x11" with matching envelopes by Neenah in Welsh Blue
Exact Index, 80 lb., 8.5"x11" with matching envelopes by Wausau in Blue (Azul)

But then I stumbled upon this beauty. It's made by ASPIRE and is called Petallics in Juniper Berry. (Petallics is ASPIRE's metallic-looking paper. Get it? Metallic+Paper=Petallic.) The color isn't an exact match to the light blue of the wedding, but it's close enough and looks FABULOUS with black damask and wording printed on it. Don't forget the matching envelopes!


Now to find this paper online for cheaper. I compared prices among The Papermill Store, Kelly Paper, and Paper Works. For the quantity and shipping costs, The Papermill Store was the clear winner! For 350 sheets of 8.5"x11" paper in 80 lb. text cardstock, I paid $37.97. (To read more about paper weight, click here.) I paid $45.97 for 250 matching envelopes.

Future Hubby thought the 4.5"x6.5" invitation would look awesome on a 5"x7" black background (he was right, of course!). Waussau makes a black cardstock (Astrobright in Eclipse color, 80 lb. cover weight) that, like the blue paper, is made from 30% recycled material. A paper distributor called epedx had the best prices and, as luck would have it, has a physical store located near Future Hubby's work. (FYI: The Papermill Store had the best online price for the black cardstock.) For 250 sheets, we paid $22.39 + tax = $24.57.

With this much blue and black cardstock and blue envelopes, we now have enough for all the invitations, thank you notes at each place setting at the reception, and thank you cards for gifts received. Woo hoo!

Cost for all the paper (invitations, thank you notes, thank you cards):
350 sheets, metallic blue: $37.97
250 envelopes, metallic blue: $45.97
Shipping for metallic paper: $12.73
250 sheets, black cardstock: $24.57
TOTAL for paper: $121.24

Check out the next blog to see how to assemble the invitations and check out how much we saved on this Do-It-Yourself invitation project!
Invitation Envelopes - Handwritten Calligraphy


While printed mailing labels provide a uniform appearance to your invitation envelopes, nothing is more personal than receiving a hand-addressed envelope. Many brides often hire someone to handwrite all those hundreds of names and addresses in fance calligraphy. Depending on who you hire and how many envelopes you have, this can be costly, ranging anywhere from $3.25 to $5.25 and on up for each envelope set (outer and inner envelope). Wow.

If you're anything like me, the Do-It-Yourselfer in you is shouting, "For that price, I'm doing it myself!" Now, not everyone knows how to write in calligraphy. Have no fear - there are many styles of fancy writing, some of which are simpler and easier to learn than others. Think you have poor handwriting skills? Irrelevant! Calligraphy is more art than writing. And even if you doubt your artistic skills, you can still learn to produce fancy letters. They are lines, shapes, images. Once you learn how to deconstruct and apply the various lines, you can create many types of calligraphy.

Now, with that said, I learned how to write in calligraphy in elementary school. Since then, I have tried different fonts and pens. I have become rather comfortable using a Sheaffer cartridge pen and writing in a modified version of Old English. Sheaffer pens are good for beginners and experts, comfortable to hold, and the cartridge style pen uses inexpensive refill cartridges.

Now that my envelopes have arrived (YAY!), I have begun the long process of handwriting each name and address. Thankfully, I have ditched the tradition of having an inner envelope in order to save money and reduce the amount of paper we are using. Since my envelopes are opaque and not white, I cannot simply slip a paper with dark lines inside the envelope to guide me. Instead, I have to draw very faint lines on the paper, which I will later erase using a plastic eraser after the ink has dried.

It takes about eight to ten minutes to measure the lines on the envelope using my template, draw the lines (again, lightly), and hand write the guest information. I am able to address ten to twelve envelopes in one sitting; after that, my hand and wrist cramp into a wicked witch position. Let's see... I will need to address 105 envelopes total... that's about ten sittings to get them all done! And if I don't have arthritis before I am done, I might be able to make some decorations (and type)!

Here is an example of one of my envelopes. I am sending a couple out to VIPs, such as the President (long address!), the CA Governor, Mickey and Minnie, and possibly Harry Potter.

If you are still interested in hiring someone to hand write your invitations and/or envelopes, here are some links: Calligraphy Lady, Craigslist, Lettering Elegance Calligraphy. You can find many more sources by typing, "handwritten calligraphy envelopes," into Google.

Cost for handwriting your own calligraphy:
1 Sheaffer Calligraphy Mini Kit (from Amazon.com): $14
Online calligraphy font instructions and templates: free
Time to learn and practice: name your own rate
TOTAL: $14 + your time and energy